The Outline is where you organize your work. It’s the place to add and save all your ideas, notes, commitments, projects, habits, and any other type of task. This large nested list of work ideas is normally much greater than our ability to actually complete. So, we need to be very selective about what should earn our attention. And, since our attention is guided by our calendar, we need to treat the calendar like our sacred territory.
In order to qualify a line in the Outline to occupy a part of our time in the calendar – or in simpler words, to schedule a task, we need to add some properties to it. If you don’t specify any properties, a line in the Outline will remain just a line in the Outline!
Below, you will find quite a large number of properties. It might sound overwhelming at first but once you set up your Outline in the right way and set the default values, scheduling a task is not rocket science. If you set up your Outline and default values correctly, you will hardly need to set up more than two properties for a task. And, setting these properties in the task title is very easy.
Most properties use either default values or are inherited as you will learn later on this page. Moreover, you can leverage multi-selecting and quickly update a large number of Outline lines at once.
Editing Task Details
On this page, our focus is to understand the individual properties and what they mean. We will also see how to set these properties in the line (task) detail. There are several ways to set these properties and they will be explained in other articles on planning.
The best place to view and/or edit properties of a line in the Outline is the line (task) detail. To open the details, you can either click on the triangle to the right of the title or use the keyboard shortcut:
SHIFT + ENTER
Once you open the line (task) detail, you will see the assigned properties. If there are no assigned properties, the detail box will be mostly blank.
Chips
Chips are small rectangular boxes that represent a property in the line (task) detail. A chip usually supports these features:
- Clicking on the chip opens a popup to enable you to change the value of the property.
- If hovering the mouse over the chip displays an x, clicking on x removes the property.
- If the chip is dimmed, the line (task) is using the default value
- If the chip has an arrow before the property name, the line (task) is inheriting this property.
The Plan
One of the key properties that a line (task) can take is the plan. There are several ways to add a plan to a line. But, since we’re discussing the line (task) detail, we’ll see how to set and examine the plan in the line detail.
A plan is either time-bound or flexible. Time-bound plans always have a completion date. You may also optionally add a start date to a plan. A start date ensures your task is not scheduled any time before the start date. Both time-bound and flexible tasks can have a start date.
To add a new plan to the line, use the plan icon on the lower right of the line detail. It’s important to note that each line can take multiple plans. So, if you click on this icon again, it adds an additional plan. To change a plan, click on the chip.
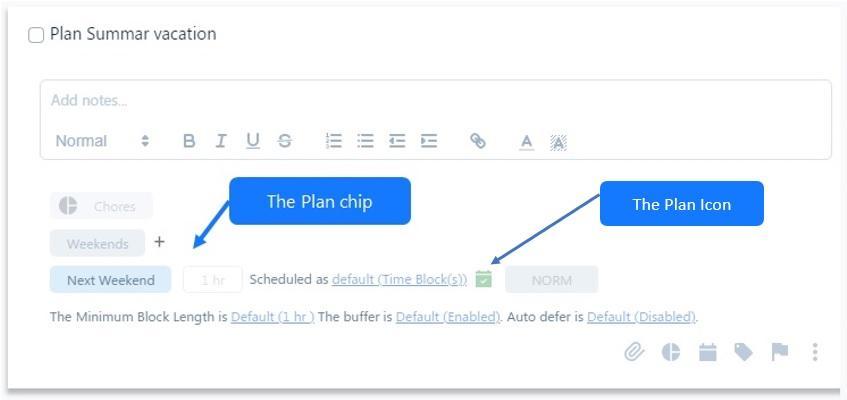
Adding a plan automatically will display several other chips in the line detail. This is done to help you see what other key properties will be used for scheduling the line (task.) You can always override the shown values by clicking on the chips.
Deadline (Due date)
A plan can be either time-bound or flexible. A time-bound plan is constrained by a completion date. That is, it must be scheduled on or before a certain date. So, you can use a plan to enforce timeframes for planning your tasks. Nevertheless, SkedPal offers an optional property called deadline. This property is merely a reference for your eyes. SkedPal does not use this property to schedule your task; it always uses the plan. The following describes how you can make use of the deadline (due date):
- You want to use this field to be able to clearly see it in the Outline. This date is displayed on the lines without having to open the line detail. You will not be able to see the plan completion date on the line unless you open the line detail.
- You will be able to create a filter for all tasks due within a certain timeframe.
- You will be able to schedule your tasks after the deadline in case you miss the deadline. This property allows you to keep the original deadline while re-planning your task to a later date.
When you set a deadline for a task without a plan, SkedPal automatically adds a plan that matches the deadline. However, if you make amends to the deadline or the plan, these two values will change independently of each other.
Overall, you should be using this field ONLY for hard deadlines that are set externally. Do not use this property for self-imposed deadlines. Please refer to the prioritization feature to learn how to prioritize your work without using time-bound plans.
Duration or Estimated Effort
To schedule a task, you’ll need to estimate the time needed to complete the task. The duration chip in the line (task) detail shows this value. The duration chip always shows in front of the plan chip. When you add a plan, the default duration is used. You can override the default duration in the line detail by clicking on the chip. You will also learn how to set the duration in the line title.
If the duration you set is less than the scheduling granularity, the line (task) will be scheduled as a small task. Small tasks are bundled together in the calendar. Since they are not long enough to take a full slot on the calendar, SkedPal tries to bundle multiple small tasks in one slot of the calendar.
If a line is a parent line with a cascading plan, the duration shown in the line detail is actually the sum of the duration of all sub-tasks. In other words, a parent task with a cascading plan cannot have a duration of its own.
Time Maps
Time Maps define your preferred times to schedule different categories of work. A line (task) can have one or more Time Maps. If you add a plan to a line, the Time Map chip will be shown in the line detail:
To add more Time Maps to a line, click on the + button. You can also assign a Time Map in the task title.
To assign a Time Map to a line without giving it a plan, you can use the “/” key in the line title. You might wonder why you would want to assign a Time Map to a line that is not planned. After all, Time Map is useful for planning only. The answer lies in the inheritance feature of the Outline. So, you might decide to define certain properties at a higher level in the Outline so they cascade down. Then, use these properties in the lower levels to schedule tasks.
Priority
Priority is a relative value that defines which tasks should get scheduled first. If you don’t explicitly set a priority for a line, it’ll either inherit the value from higher-up lines or it’ll use the default value.
The priority chip shows in front of the plan chip as soon as you add a plan to the task. To set a different value, click on the chip and choose a different option. You may also decide to use the triage tool to find the most appropriate priority for your task.

Tags
Tags or Smart Tags are a great tool, especially when used in conjunction with filters. You will find the tag chips at the top of the chip stack. To add a new tag click on the tag icon on the lower right of the line detail. If there is a tag chip in the line detail already, you can click on the + button next to any existing tags to add more tags. You may also add tags in the task title.
Zone
When you assign a productivity zone to a task, you’ll be able to monitor and manage the amount of time you’re spending in this specific zone.
To add a zone in the line detail, click on the zone icon in the lower right of the line detail. If you do not see the zone icon, it’s because you haven’t added any zones yet.
Zones, like Time Maps, cascade down.
A line can only have a single zone. Unlike Time Maps, there is no default zone. You can remove the assigned zone in a line detail by clicking on the x in the chip.
Budget
While zones can enforce time budgets, you can add time budgets at the line level on top of the zone budget. To add a time budget to a task, use the line detail menu and select Add budget. If this option is dimmed in the menu, it’s because you haven’t yet applied a plan to that line.
There are several reasons you might want to use a budget at the line level. For example, if you have a long task, SkedPal might schedule a very long time block for it. To spread it evenly across several days, you may add a daily time budget.
Another example is if you have a very high-priority project. Since it’s a high priority, SkedPal is going to allocate all of your available daily or weekly time to this project. But, you may want to avoid this situation because on one hand your energy for focused work per day is limited. And, on the other hand, you do want to leave some time for other lower-priority tasks to get done.
The Time Frame on the Budget Form is the time frame in which the budget is enforced. So, if your main plan is from the 1st to the 31st of Oct., you may opt to enforce the time budget only during the first week as an example.
If you leave the Time Frame blank, the budget is enforced throughout the lifespan of the plan.
Time Block vs Bundle
Time blocking and bundling are two different types of scheduling used in SkedPal. When you add a plan to a line, the chip for this property shows in front of the plan. It normally uses the default value unless you change it. To change this value, click on the chip to see the options.

Minimum Block Length
When you set a duration for a task that is long, SkedPal may not be able to schedule the full length of the task in one block of time. For example, if you set a task duration to 10 hours, SkedPal may schedule this task in three segments over the next few days. Sometimes, you have a specific preference for the minimum amount of time you want to spend on a task in one session. This is called the Minimum Block Length (MBL.) For example, if you’re writing a book, you don’t want a time block shorter than 2 hours to get scheduled. Other examples include a task for shopping. Let’s say that your shopping takes about 2 hours. Obviously, you don’t want SkedPal to split this task into segments. This is where you need to set the Minimum Block Length (MBL.)
Note that if your task duration is shorter than the minimum block length (MBL), MBL will be ignored. For example, if your default MBL is 1h and your task duration is 5 minutes, MBL will not play a role here in scheduling your task.
The default MBL is set for all tasks. And, you’ll be able to see the MBL in the line detail. Nevertheless, you can override the default MBL by clicking on the underlined text:
There are times that you may want to enforce maximum hours per day for a task. This is managed in time budgets.
Buffer
Adding a buffer to your task is a good practice. Buffer can make up for interruptions or other unplanned activities that can come up during the day. So, if your task is estimated to take 2 hours and you have a buffer of 20%, you will get an additional 30 minutes (24 minutes rounded to 30) of open space after your scheduled task.
The default buffer is set for all tasks. And, you’ll be able to see the buffer in the line detail. Nevertheless, you can override the default buffer and disable the buffer for this specific task. To do that, click on the underlined text:
Auto-Defer
When you set a time-bound plan for a task in SkedPal, you’re specifying a timeframe and want your task to get scheduled sometime within the timeframe. There are times when you either miss this timeframe, or you just don’t have the bandwidth to schedule the task during that timeframe. If this property is turned on for your task, SkedPal will postpone the timeframe you initially specified to a later date in order to be able to schedule your task.
A much better alternative to using auto-defer is to use the flexible plan in combination with prioritization.
The default value of this property is set for all tasks. And, you’ll be able to see the auto-defer property in the line detail. Nevertheless, you can override the default value and/or disable auto-defer for this specific task. To do that, click on the underlined text in the line detail:
Parent Tasks
When you plan a project (or parent) line, some additional properties show up in the line detail. Mainly, there will be two additional properties:
- To cascade down the plan or not
- If cascading down the plan, how to schedule the ‘sublines’ (sub-tasks)? Are they sequentially dependent?
If you do not cascade down the plan, the parent line gets scheduled. On the other hand, if you do cascade down the plan, the parent line does NOT get scheduled but the plan is inherited by the ‘sublines’ and they will get scheduled.
‘Sublines’ can get scheduled in either of the following ways:
- Sequential – They must be scheduled one after another. The order must be maintained.
- Parallel – It does not matter if one of the ‘sublines’ gets scheduled earlier than another sub-task higher up on the list.
- Sequential One at a Time – This means that at any point in time, only the first subline (sub-task) gets scheduled. Once you complete the first one, the second gets scheduled.
Parent Task Duration
If a line is a parent line with a cascading plan, the duration shown in the line detail is actually the sum of the duration of all sub-tasks. In other words, a parent task with a cascading plan cannot have a duration of its own.
Task Properties Cascade Down – Inheritance
This is a key feature of the Outline. Many task properties cascade down to lower levels. This enables you to set the property once at a higher level and SkedPal will assume this property for all lines under this branch unless you override it. There are two exceptions to this rule: Smart Tag and duration. These two properties do not cascade down.
When a line inherits the properties from higher up, or when the line is using a default value for a property, the property chip has an arrow icon. To override the property, you can either click on it to give it a new value or click on x on the chip to remove the property.
Default Properties
The following properties always use a default value unless you override them. To change the default values, click on the links below to find out where the default value is set in the app.
Duration
Time Map
Priority
Time Block
Minimum Block Length
Buffer
Auto Defer
Removing or Replacing Properties
To replace a property, click on the property chip to get the list of options for replacement.
To remove a property, hover the mouse over the chip and if you see an x, clicking on x will remove the property. Sometimes, you will not see an x. For example, if you try to remove the default Time Map of a task, you will not be able to do it because a task must have at least one Time Map.
Dimmed Properties
Property chips that show dimmed default properties. You can override these property chips by clicking on them and setting a new value.
