The board is an alternative perspective on your tasks compared to the Outline. While the Outline is organized with the goal of making it easy for you to locate specific projects or tasks, the board is designed to help you prioritize your tasks. When organizing your work, it should not matter which part is more important than the others. What matters is the semantic relationship between the elements of the Outline. For example, all personal tasks should go under the personal branch of the Outline.
There will always be times when some personal tasks will have a higher priority compared to work-related tasks and vice versa. Therefore, a different view of your tasks is required for prioritization. The board is that view; it helps you move tasks around to prioritize them without affecting the organization of the Outline.
Think of the board as a canvas for your prioritization. You can bring in your tasks to the board and then drag them around to change their priorities.
Master List of Priorities
To view the board, click on Board on the left pane. Initially, the board will not have any tasks. What you will see first are the columns and the header of the columns:
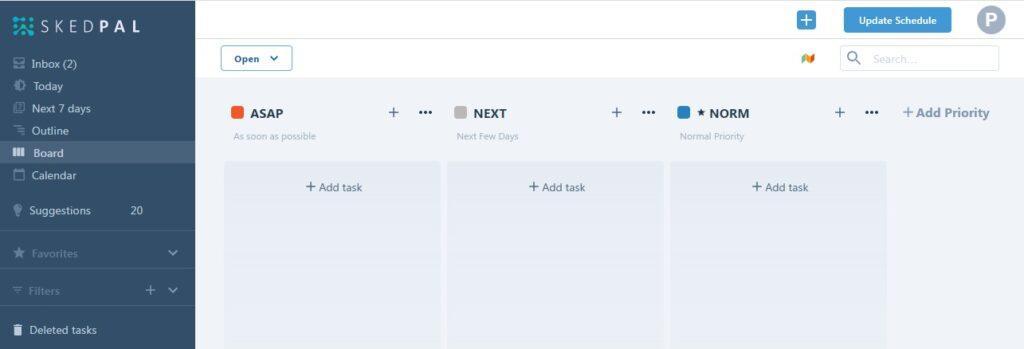
Each column represents a priority level. The left-most column has the highest priority and the right-most column has the lowest priority. You can fully customize the priority levels. In fact, you can have up to 9 priority levels. We recommend 3 to 5 levels as more levels will probably be overwhelming.
To rename a column, click the name and rename it.
Default Priority
One of the columns always represents the default priority. The default priority plays a significant role because all new tasks that you add to the Outline will have this priority unless you override it. It works very similarly to other default values.
The default priority on the board always has an asterisk (*) next to the priority name.
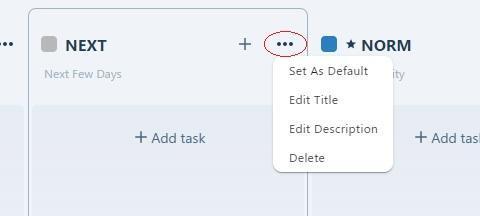
To set a column (priority) as the default, click the column menu and select Set as default.
Relative Priority
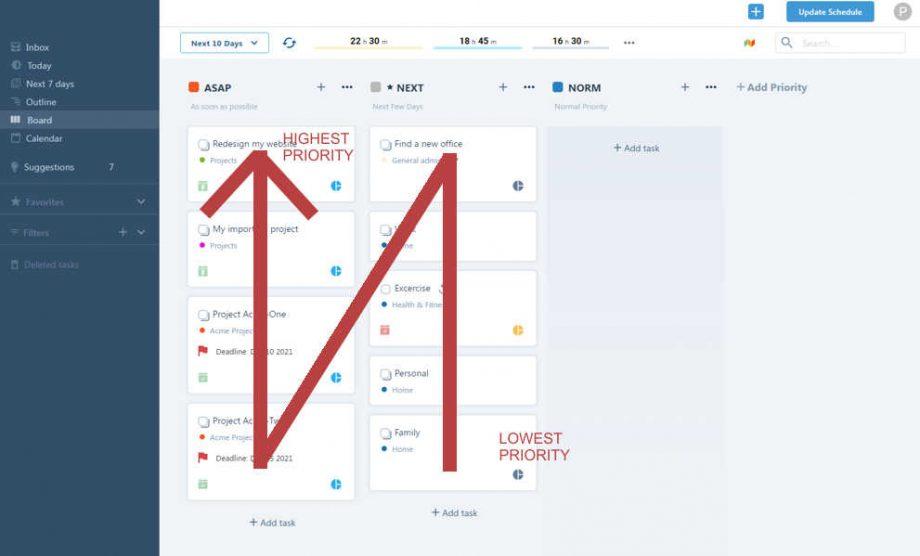
Of course, each column can contain multiple tasks. Although all these tasks will share the same priority level, their relative position in the column will also count for prioritization. In other words, the higher up a task is in a column, the higher priority the task has compared to the other tasks in the same column.
Nevertheless, the top most task in a column always has a lower priority compared to the tasks in the column to the left of it as shown in the image below:
Priority Color
On the left of each priority name in the header of the columns, you will also see a colored box. Click the box to change the color of the priority. This will help you in the Outline to highlight your tasks with the priority color.
Filters on the Board
The board is not meant to show 100% of your tasks in the Outline. You want to bring in only tasks that need to be prioritized. Think of the board as a canvas that helps you see and manage a limited number of tasks and how they compare to each other in priority. For example, you may want to prioritize your work for the next 7 days. So, there is no need to clutter the board with other tasks. You want to only consider the next 7 days and make sure that you have the right set of tasks for this period.
When you first visit the board, it’s loaded with a default filter. But, you can change the content of the board. There are two ways to populate the board and have just the right view with the right tasks to prioritize:
Open a filter to load the board.
By opening a filter, you will pull in all tasks that match the filter criteria. The filter is dynamic and each time you open the filter, you might get different results. So, the board view also has a dynamic nature. It’s important to note that you cannot save the board view. You can load it with a filter and you will see the tasks matching the filter criteria at that point in time. Nevertheless, when you drag & drop tasks on the board, you ARE saving the relative priority of the tasks.
There are some preset filters on the board. You can also create your own filters.
It’s worth noting that the board filters are exclusive to the board. In other words, the filters on the left pane and the filters on the board are mutually exclusive.
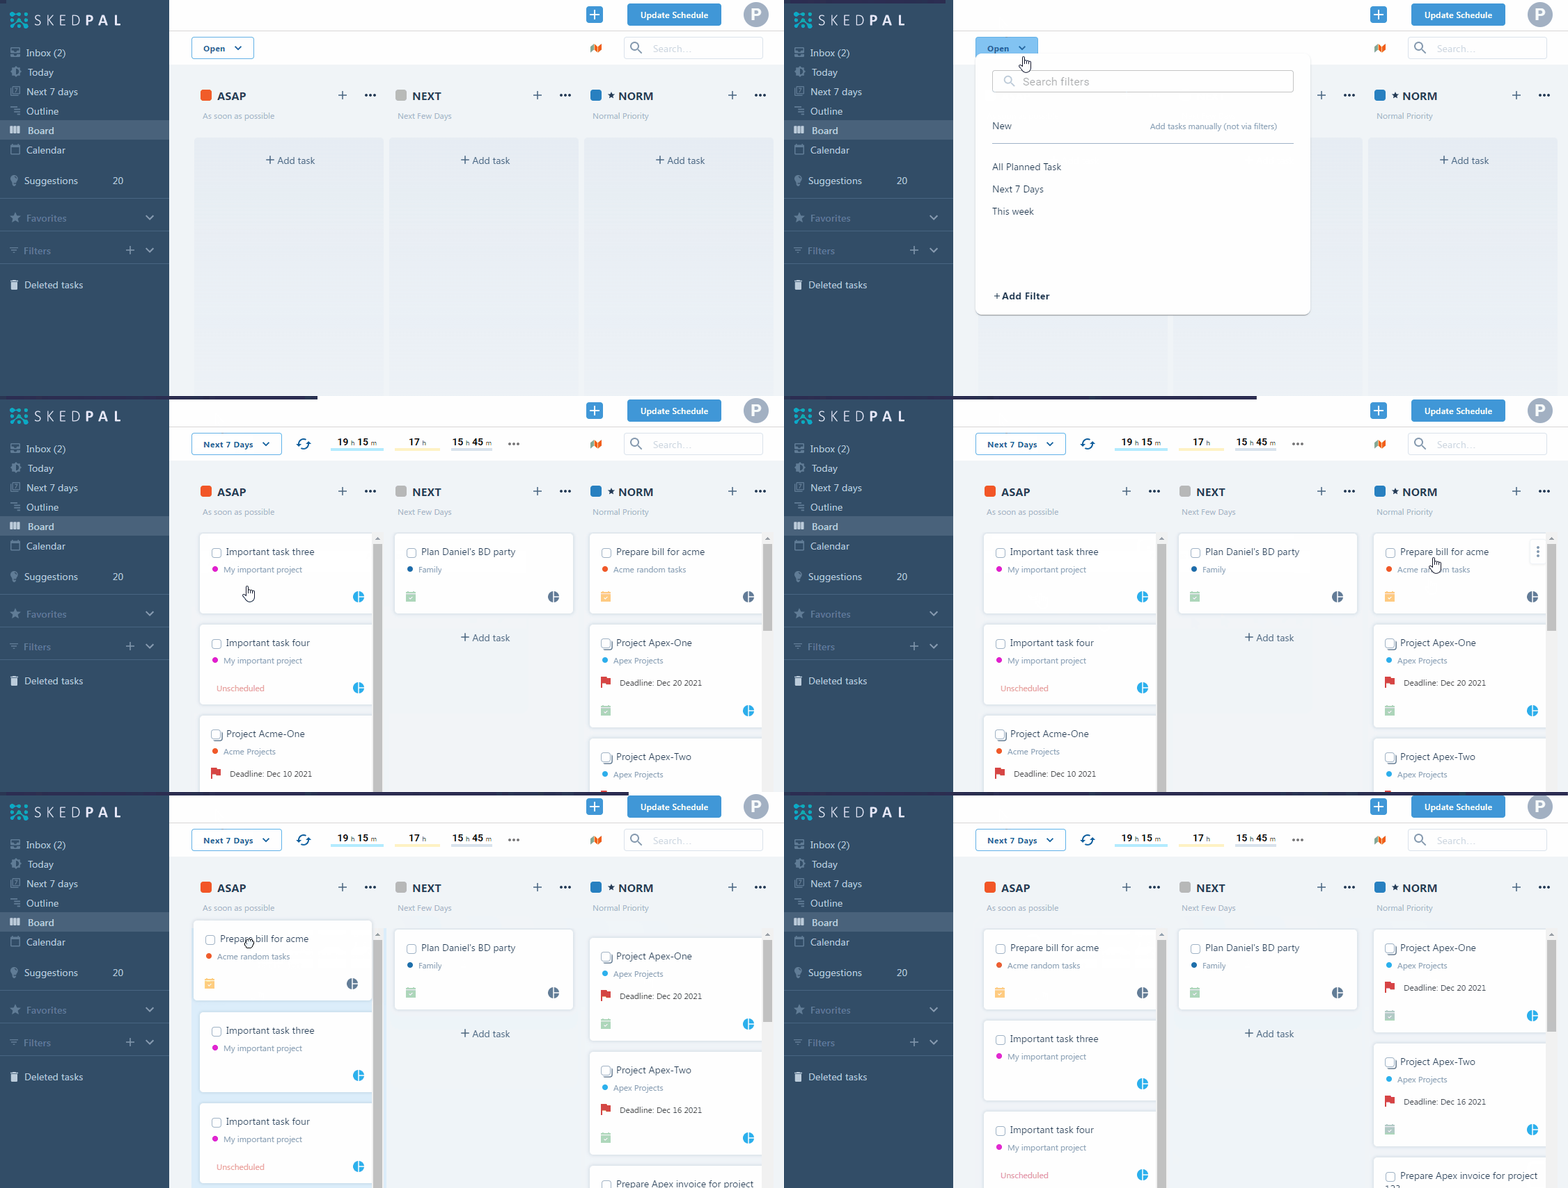
Add tasks individually.
Sometimes, you may want to manually add tasks to the board. The following examples offer some insight into this method:
- You’ve loaded the next 7 days filter. You’re looking at the board, and you notice that a task or project that must be scheduled in the next 7 days is not on the board. Now, you can manually add this task or project to the existing tasks on the board.
- There are a few tasks that you want to prioritize relative to each other but it’s hard to create a filter criterion that gives you exactly what you want. In this scenario, you will start with a NEW board and then add tasks individually.
To individually add tasks to the board, you have two options:
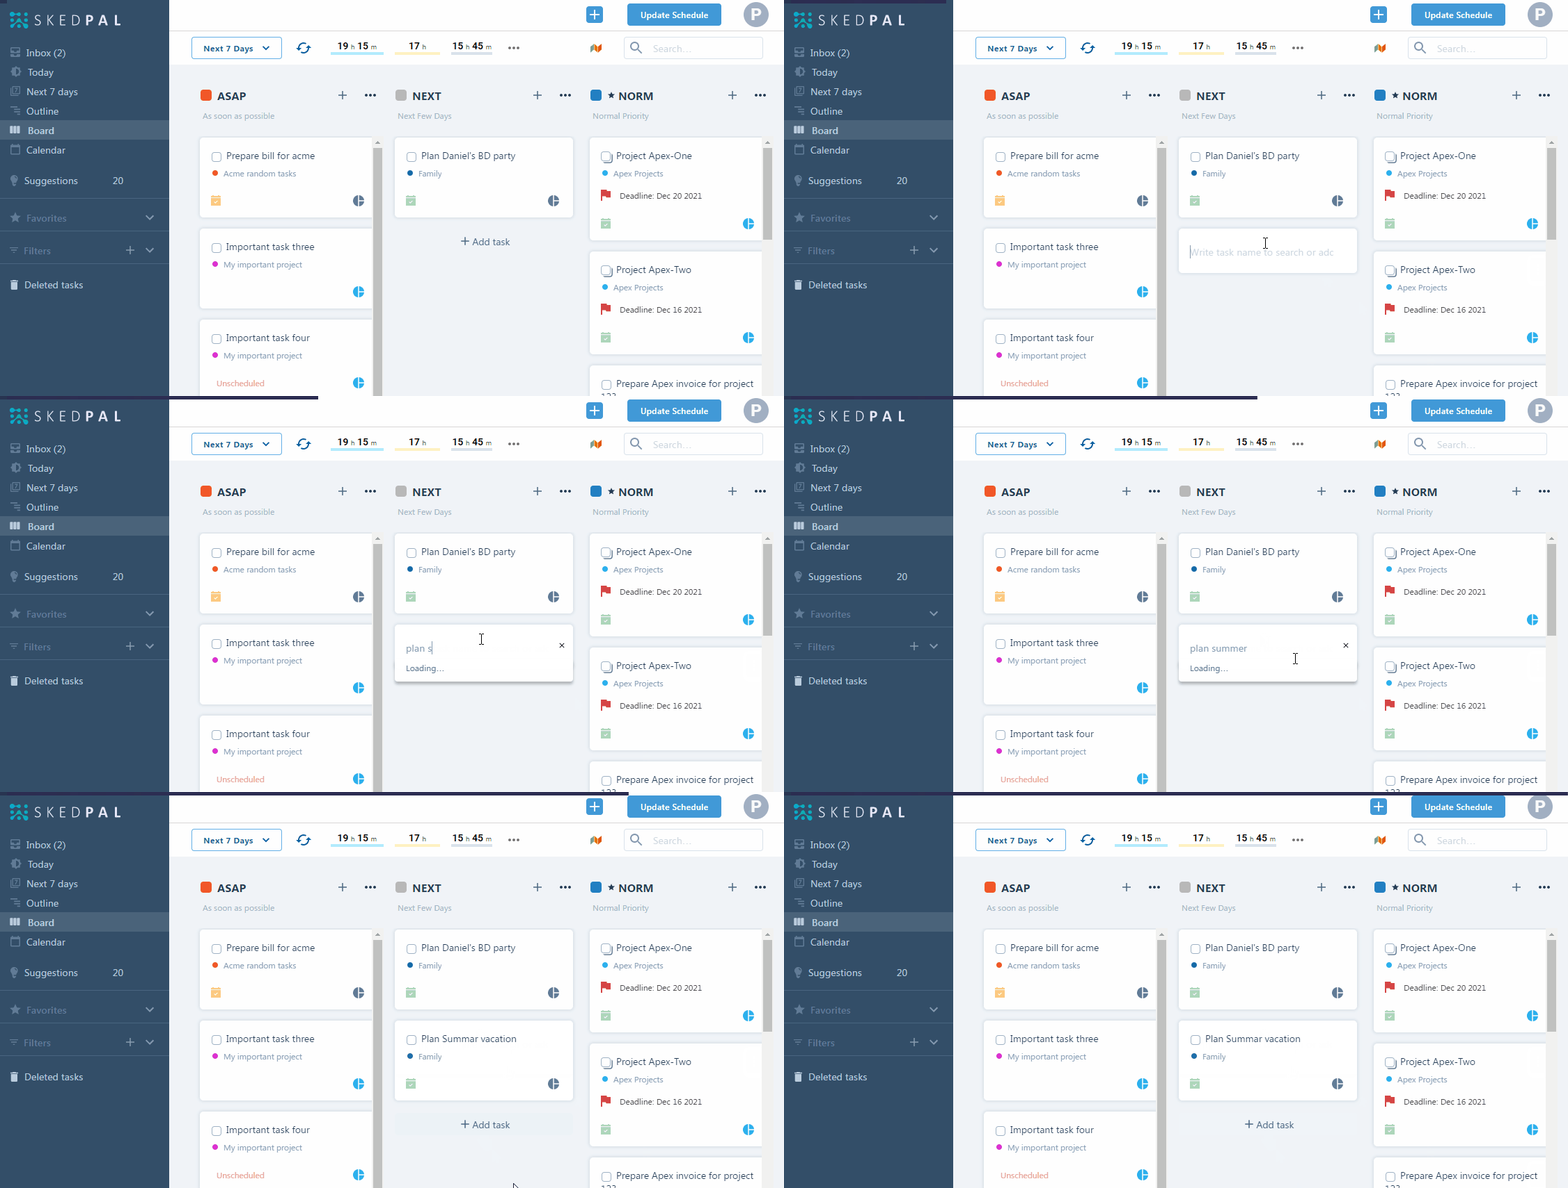
- Click ‘Add task’ at the top or bottom of each column to search for your task and add it to the board.
- Use the ‘Cherry picking’ method in the Outline explained below
Sometimes, it’s much easier to browse the Outline and then pick items that should be added to the board. To do so, go to the Outline and click on the cherry-picking icon at the top of the screen.
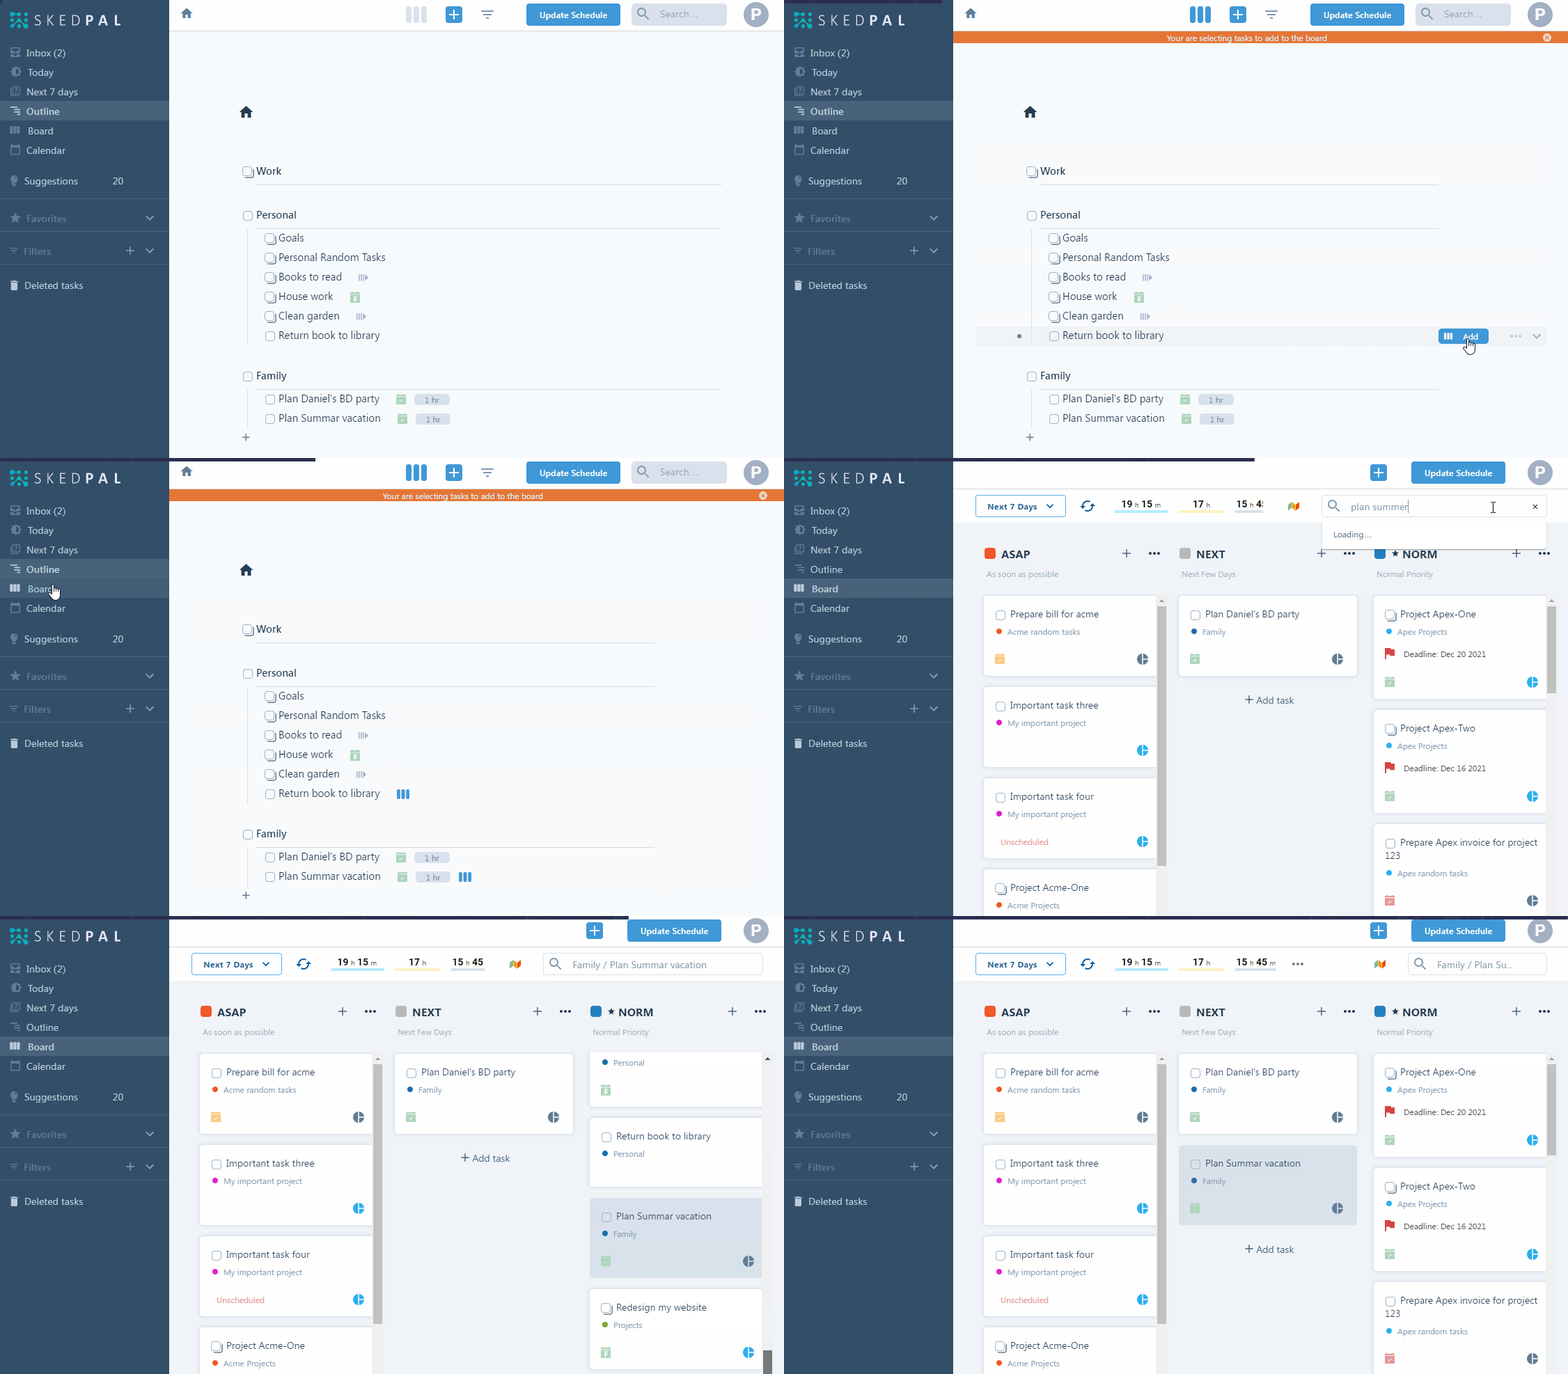
This will put you in the cherry-picking mode in the Outline. In this mode, when you hover the mouse over a line in the Outline, you will see a button appearing that reads ‘Add‘. Click this button, and the line will be added to the board.
Prioritizing Timeframes
The best way to prioritize your work is to view the existing scheduled tasks for a specific timeframe and see if there are any changes required to be made. When you open the next 7 days filter, for example, you’re viewing what is scheduled in the next 7 days as is. Then, you should ask yourself if there are any projects or tasks that deserve to be on this list but aren’t. After you individually add these tasks or projects to the board and drag them to high-priority positions on the board, you are practically de-prioritizing some of the other tasks on the board. So, if you update-schedule, some of the lower priority tasks will most likely disappear from your board. This is because your board filter is for the next 7 days and some of the lower priority tasks are pushed back and will not schedule in the next 7 days anymore.
Breaking Down
When you see a project on the board, you may want to break it down into the sublines (or tasks) under the project. So, instead of seeing the parent on the board, you want to see the individual tasks under the parent. This will enable you to prioritize specific tasks under the project rather than prioritizing the entire project. To break down a project, hover the mouse over it and click the breakdown icon:
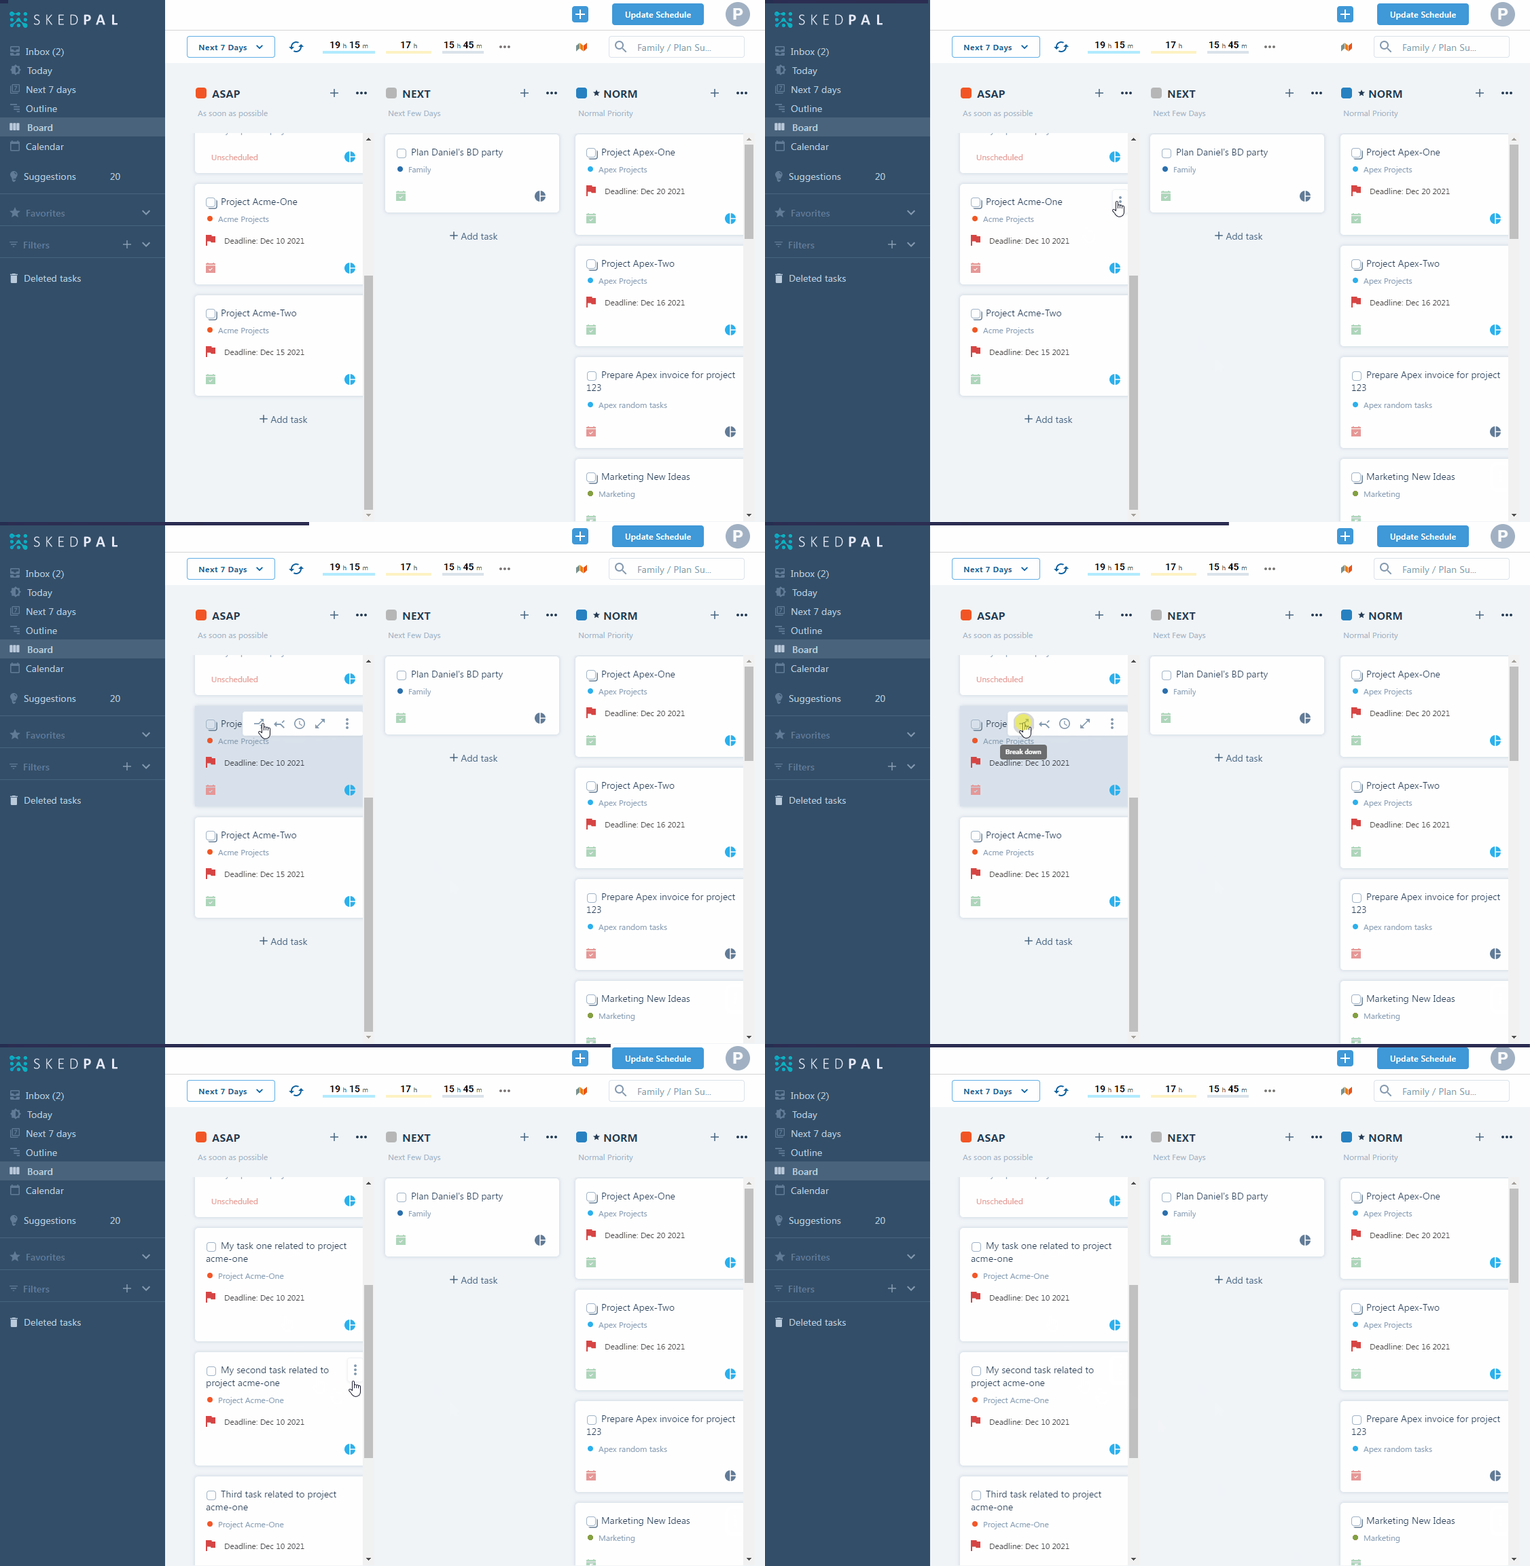
Similarly, sometimes you may see the overarching task that represents all sessions of a recurring plan. If you wish to prioritize one or more specific sessions of this task, you should first break it down into sessions and then drag & drop the right sessions. Breaking down a recurring task is exactly like breaking down a parent, simply click the breakdown icon.
Rolling Up
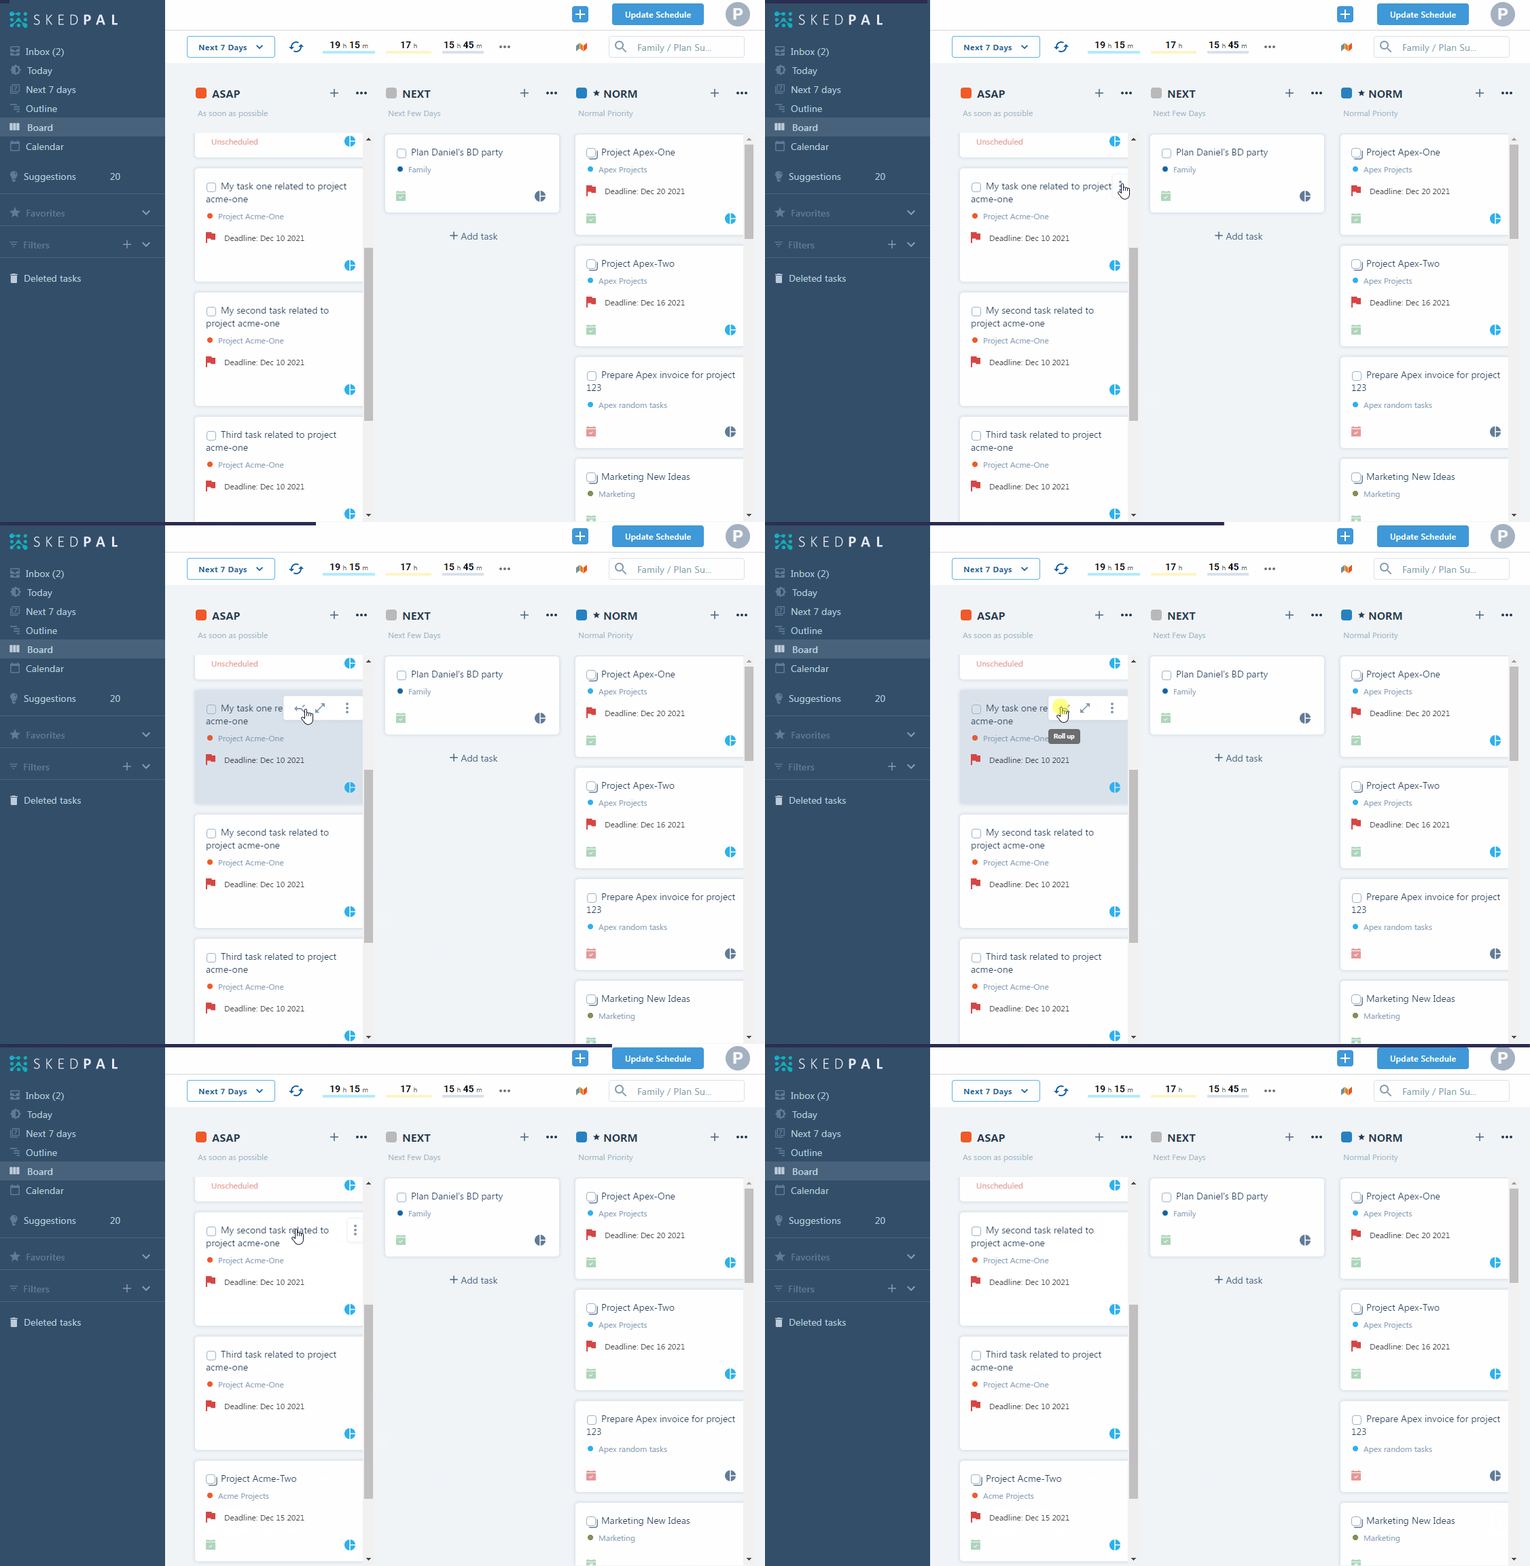
The opposite of breaking down is rolling up. To understand this, let’s first recap the inheritance feature. Priority is one of the properties that cascade down in the Outline hierarchy. So, if you have a project with priority A, all tasks under this parent will inherit the same priority A. When you break down this parent and drag an individual task on the board, you will be giving this task a direct priority. In other words, this task will no longer inherit the project priority. The process of rolling up means that you want to remove this direct priority of the task and you want this task to use its parent priority.
If a task has a direct priority on the board, you will see the roll-up icon:
An Example: How The Board Loads Tasks
Here’s how tasks are loaded onto the board, taking into account your chosen filters and task priorities. To illustrate this process, let’s consider the following outline:
Work
Project One
Task One-A
Task One-B
Project Two
Task Two-A
Task Two-B
Suppose all four tasks are scheduled for the next 7 days. However, only Task Two-A and Task Two-B have direct priorities, while nothing related to Project One has ever been prioritized in the past. In other words, Task One-A, Task One-B, and Project One lack any direct priorities. In this scenario, the board will display the following items:
Work
Task Two-A
Task Two-B
If you want to see Task One-A and Task One-B on the board, you have two options:
Break down “Work” into projects and then break down “Project One” into its sub-tasks. Then, drag and drop Task One-A and Task One-B to give them a direct priority.
Alternatively, simply use the task details for Task One-A and Task One-B to assign them a direct priority.
Time Map Indicators
When you open the timeframe filters such as Next 7 Days, they will load the board with all tasks scheduled in the next 7 days. If you want to include only work-related tasks during the day and exclude personal tasks, you can edit your filter and add the Time Map criterion or parent criterion to limit the filter to a specific group of tasks.
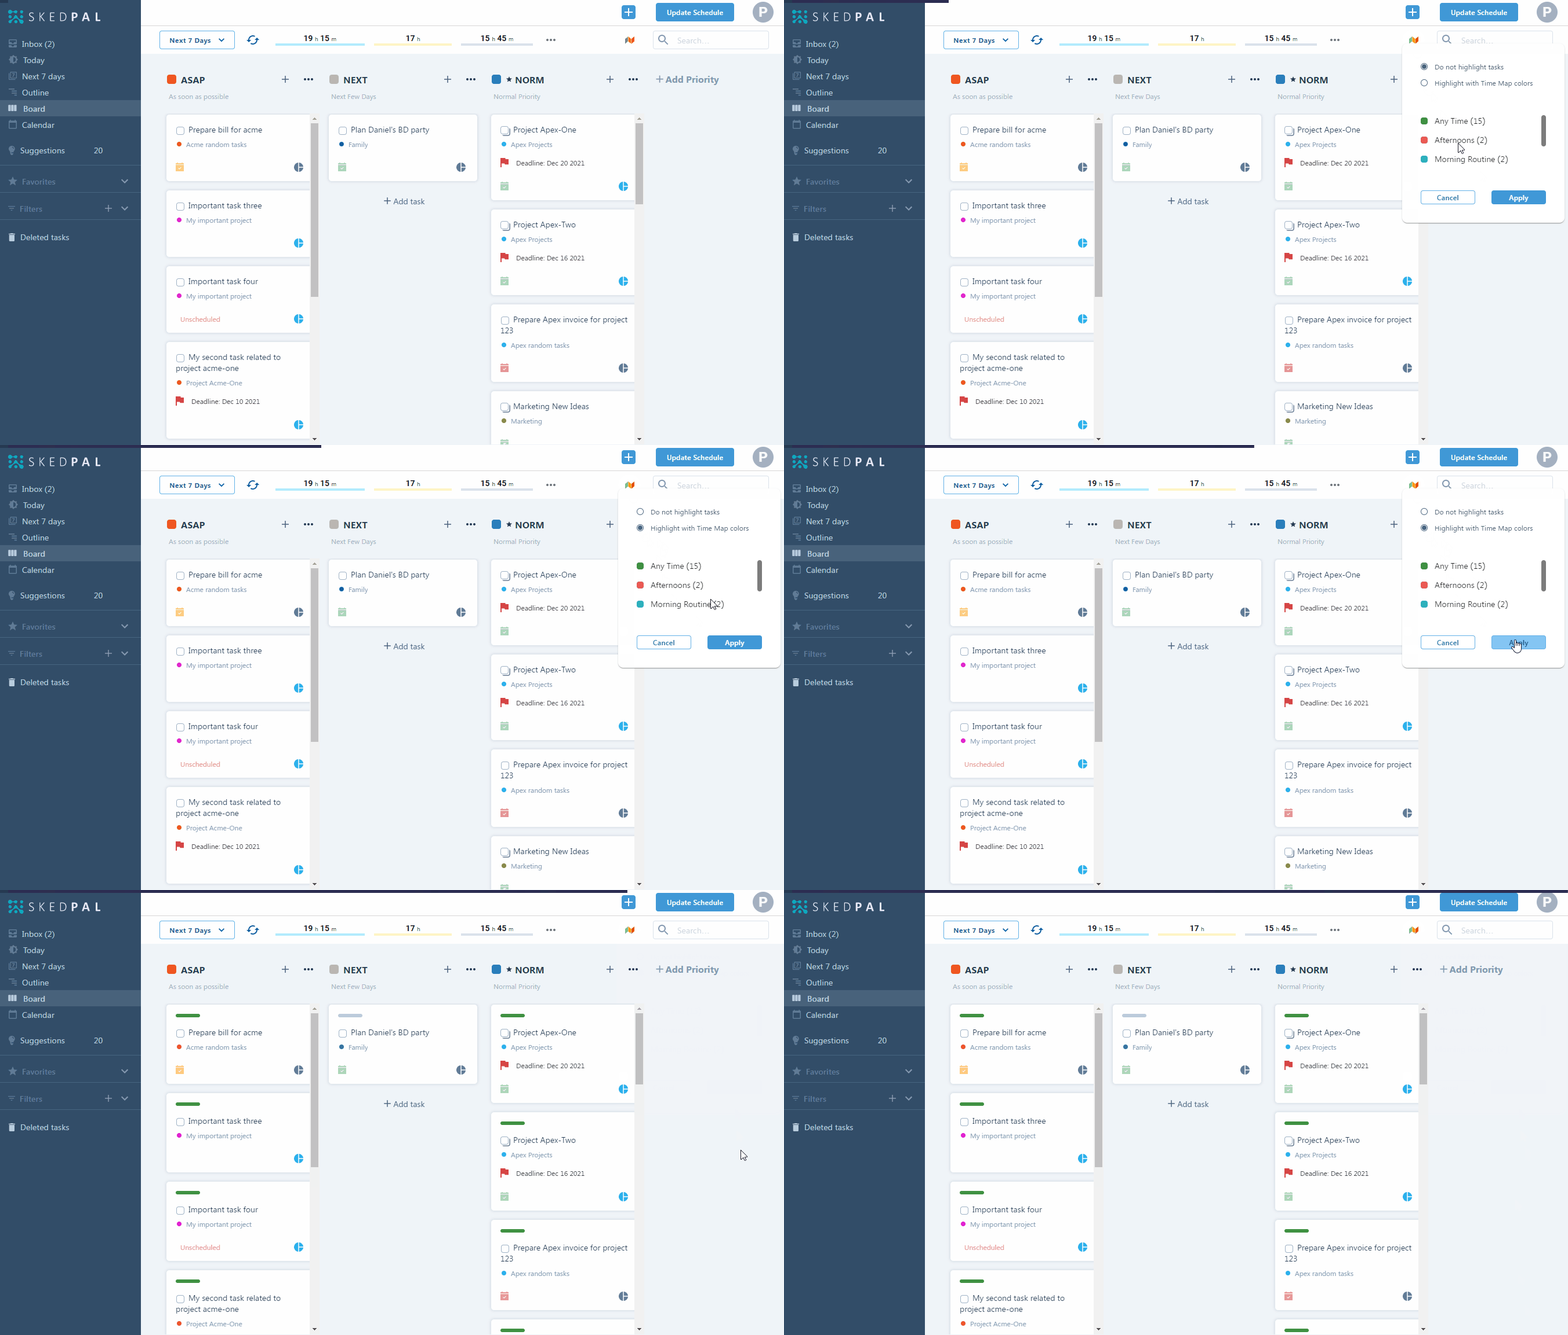
Alternatively, you can turn on the Time Map indicators on the board. This will help you visually distinguish tasks by their Time Maps. This will only work if you have assigned colors to your Time Maps.
To turn this option on, click the Time Map icon on the board:
The Board Metrics
You’ve probably noticed some numbers at the top of the board when you load the board with a timeframe. These are the hours that you have scheduled and completed for each zone. If I want to make sure that you spend a minimum of x hours for your deep-work zone, as an example, this is where you can measure how you’re doing against your target.

The darker shade indicates the completed tasks and the lighter shade is the scheduled tasks. Completed tasks are the ones on your calendar. So, make sure you use the partial complete feature to set the exact timings for the tasks you complete.