While the Outline hosts all of your projects, tasks, ideas, and notes, the calendar should include only what’s most important to you. To schedule the most important lines (tasks) in the Outline, you need to set a plan. The following helps you understand the terminologies used and ways to set a plan.
Terminology
Plan
A line in the Outline can have no plan, a single plan, or multiple plans. Once a line is planned, SkedPal will try to find the best time to schedule the line (task.) Examples of a plan are: ‘Today’, ‘Flexible’, ‘Apr 15 to Apr 30’, or ‘Start from tomorrow’
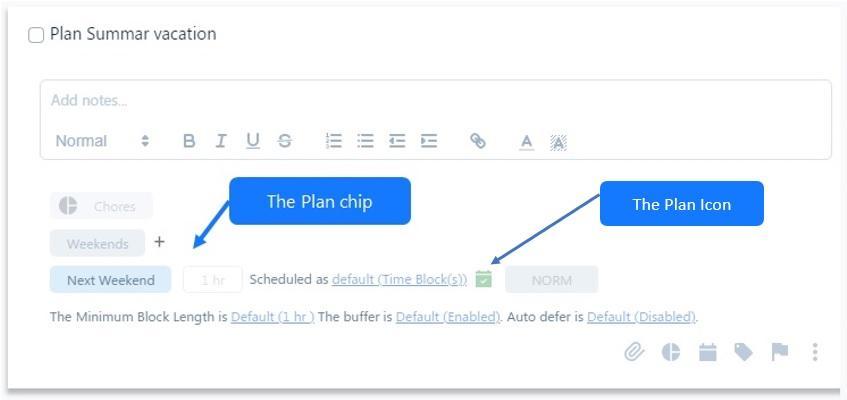
Plan Icon
Once a line is planned, the details of the plan can be seen in the line detail. In addition, an icon is also shown next to the line title to indicate that this line is planned. This icon is visible as you’re browsing the Outline and helps you identify the planned lines without opening the line detail. The icon can appear in multiple shapes and colors. To see the full details, see Plan Status.
Inherited Plan vs Direct Plan
Line scheduling properties cascade down in the Outline. One of the properties that cascades down is the plan. Once a plan is cascaded down, the sublines inherit the plan from higher up. This is a great way to plan projects.
Schedule
Once you set a plan for a line in the Outline, the “Update Schedule” process will try to schedule the line or the sublines. If it succeeds, the line will be either time blocked or added as a task to a bundled list in the calendar. If SkedPal fails to schedule the task, a suggestion is made to reconsider your plans.
Scheduling Status
The plan icon appears in different shapes and colors to indicate the scheduling status. This is explained in full length here.
Deadline / Due Date
A plan can be either time-bound or flexible. A time-bound plan is constrained by a completion date. That is, it must be scheduled on or before a certain date. So, you can use a plan to enforce timeframes for planning your tasks. Nevertheless, SkedPal offers an optional property called deadline. This property is merely a reference for your eyes. SkedPal does not use this property to schedule your task; it always uses the plan. The following describes how you can make use of the deadline (due date):
- You want to use this field to be able to clearly see it in the Outline. This date is displayed on the lines without having to open the line detail. You will not be able to see the plan completion date on the line unless you open the line detail.
- You will be able to create a filter for all tasks due within a certain timeframe.
- You will be able to schedule your tasks after the deadline in case you miss the deadline. This property allows you to keep the original deadline while re-planning your task to a later date.
When you set a deadline for a task without a plan, SkedPal automatically adds a plan that matches the deadline. However, if you make amends to the deadline or the plan, these two values will change independently of each other.
Overall, you should be using this field ONLY for hard deadlines that are set externally. Do not use this property for self-imposed deadlines. Please refer to the prioritization feature to learn how to prioritize your work without using time-bound plans.
Setting A Plan Using Natural Language ( NLP / English) in the Task Title
The easiest method to set a plan is to use Natural Language Processing in the line title. There are some limitations though:
- You cannot set multiple plans for a line using NLP
- Currently, you cannot set a recurring plan using NLP
- The NLP is limited to the following formats. If you need a different format, please use the line detail to set the plan.
Please note that if SkedPal highlights a phrase in the title of your task but the phrase is not intended to be a scheduling property, please use the backspace key to clear the highlight.
Planning examples using NLP:
|
What you type |
What your task plan becomes |
|
today |
complete by end of today |
|
tomorrow |
start from today and complete by end of
tomorrow |
|
this week |
start from today and complete by end of the
week |
|
next week |
start from start of next week and complete by
end of next week |
|
this month |
start from today and complete by end of the
month |
|
weekend |
start from Saturday and complete by Sunday |
|
on Wed or Wed |
start from Wednesday and complete by Wednesday |
|
by Wed |
start from today and complete by Wednesday |
|
on Sep 15 |
start from September 15th and complete by
September 15th |
|
Sept 15 |
start from today and complete by September 15th |
|
in 4 days |
start from 4 days from
now (time of entry) |
|
tomorrow 3pm |
fixed plan for tomorrow at 3:00 PM |
|
15 Jul 14:00 |
fixed plan for 15 July at 14:00 |
|
due by Sept 15th |
start from now and complete by September 15th.
Also add a hard deadline for 15th |
Other Planning Examples:
|
What you type |
What your task plan becomes |
|
flexible |
As soon as I can based on priorities |
|
from tomorrow to Wed |
start from tomorrow and complete by Wednesday |
|
from Sep 15 to Sep 17 |
start from Sept 15 and complete by Sept 17 |
|
start in two weeks |
start in two weeks from now |
|
begin in two weeks |
start in two weeks from now |
|
no earlier than Jan 18 |
start from Jan 18th |
|
the week of Jul 5 |
start from first day and complete on the last
day of the week July 5th falls in. (important:
“the” must precede “week”) |
|
delay until Jan 18 |
start from Jan 18 |
|
start on Jan 18 |
start from Jan 18 |
|
from Jan 18 |
start from Jan 18 |
Setting A Plan Using the Task Detail’s Plan Popup
The advantage of using the line detail for planning is that you have a lot more control over the plan(s). Normally, you should be using the NLP method but in some cases (e.g. planning recurring tasks or setting up a sequential project plan), you will need to use the line detail.
To add a new plan, click on this icon in the lower right of the line detail. Notice that if the line is already planned, clicking on this icon will add a new plan on top of the existing plan.
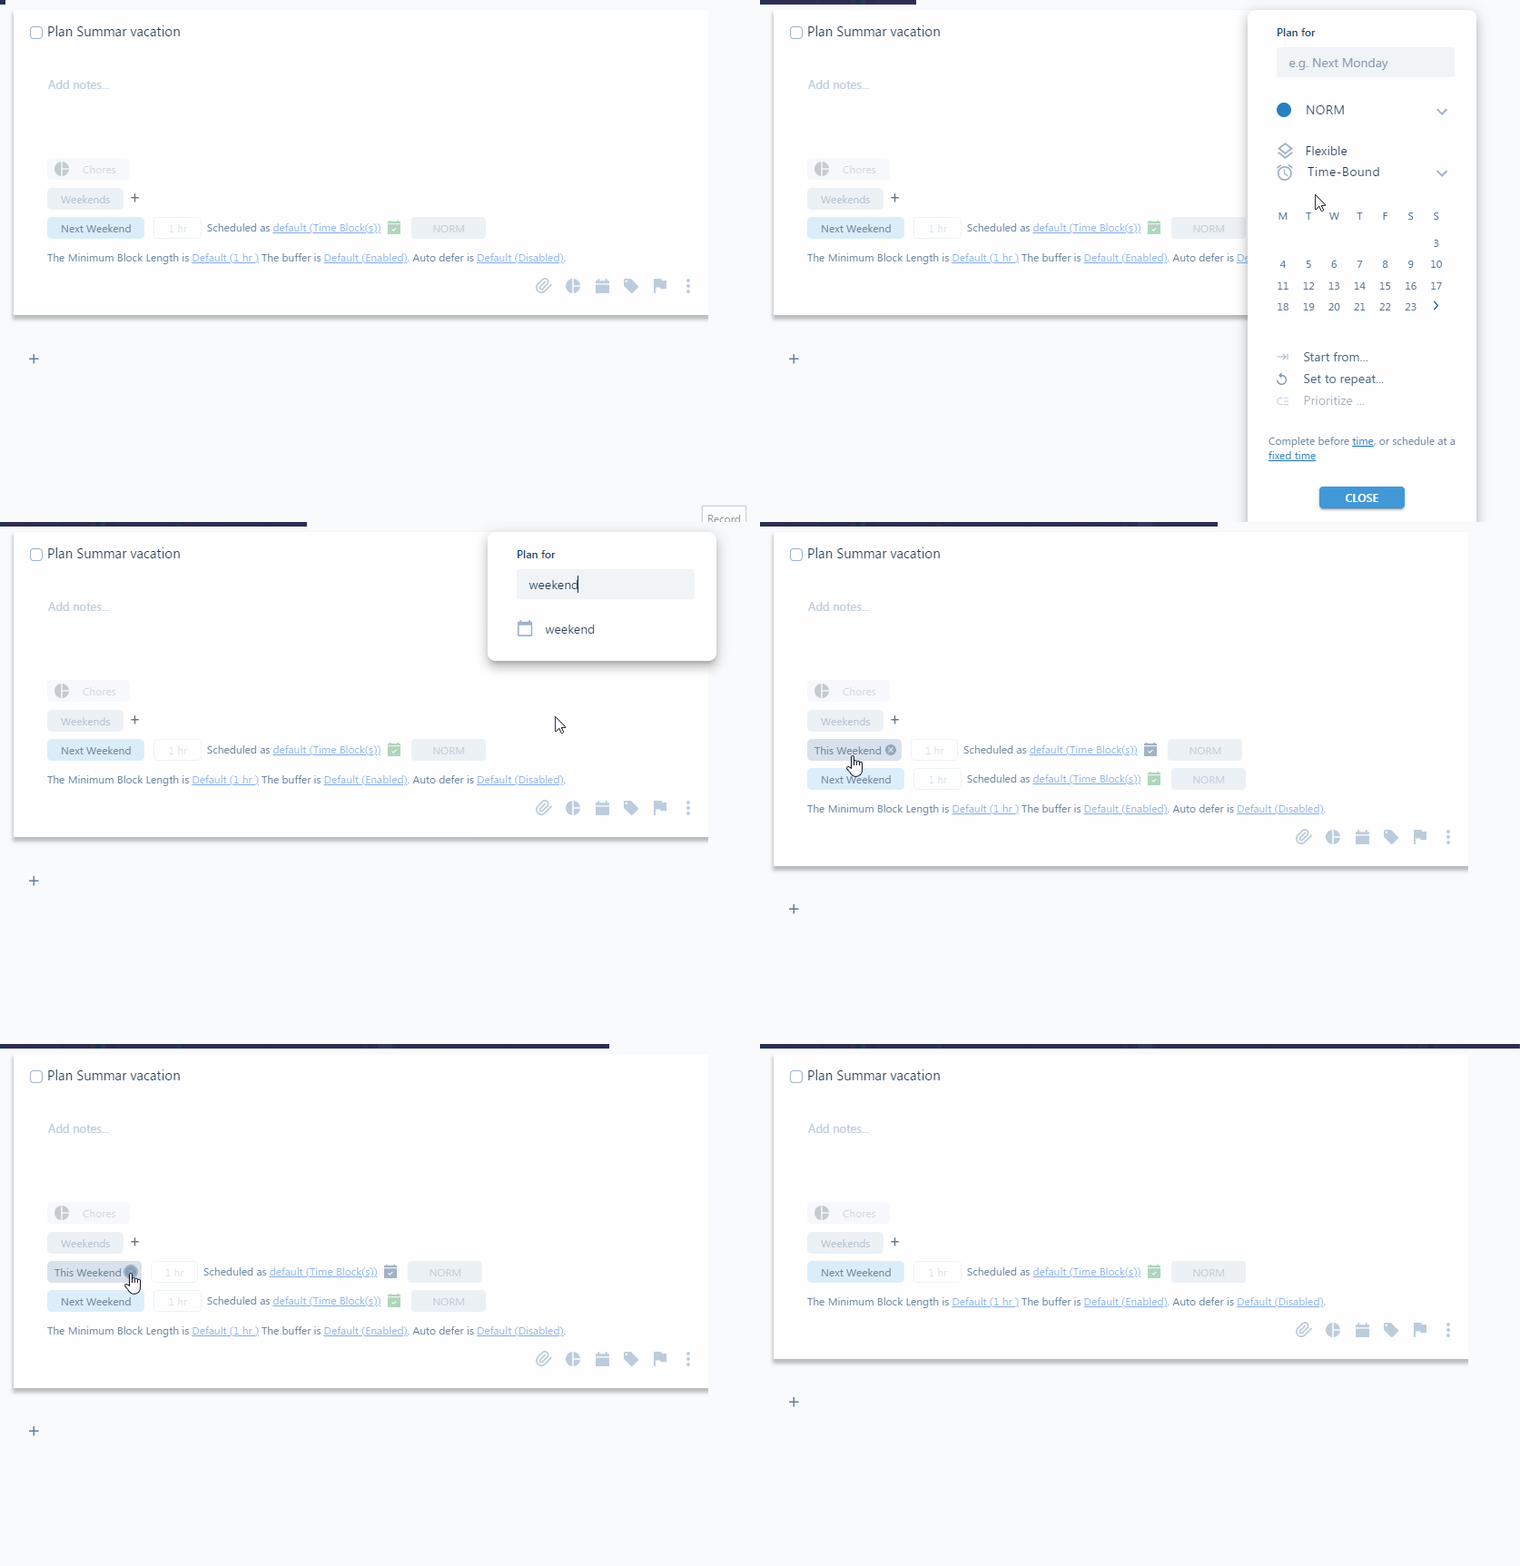
To edit a plan, click on the plan chip:

The Plan Date Picker
When you add a new plan using task detail or edit an existing plan, the plan date picker pops up. You can also open this utility using the following keyboard shortcut:
CTRL (⌘ ) + SHIFT + L
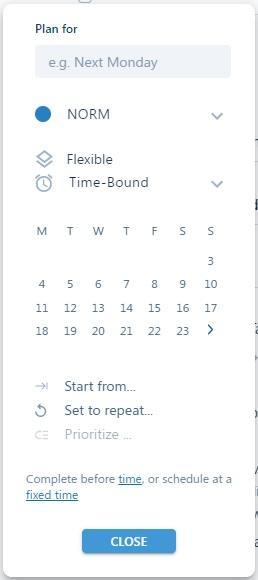
Default Properties Show After Plan is Set
When you add a plan to your task for the first time, you will notice that several other task properties are automatically shown for your task. These are the default properties of your task. The following lists the default properties that appear once you set a plan for a task for the first time:
- Default Duration
- Default Time Map
- Default Scheduling Type (Time Block or Bundle)
- Default Priority
- Default Minimum Block Length
- Default Buffer
- Default Auto-Defer
For a more in-depth explanation, please refer to Understanding Task Properties.
Setting Deadline (Due Date)
To set a deadline using NLP, use the “due” keyword and then add the date as shown in the examples below:
Return book to the library due Wed
Pay bill due June 15
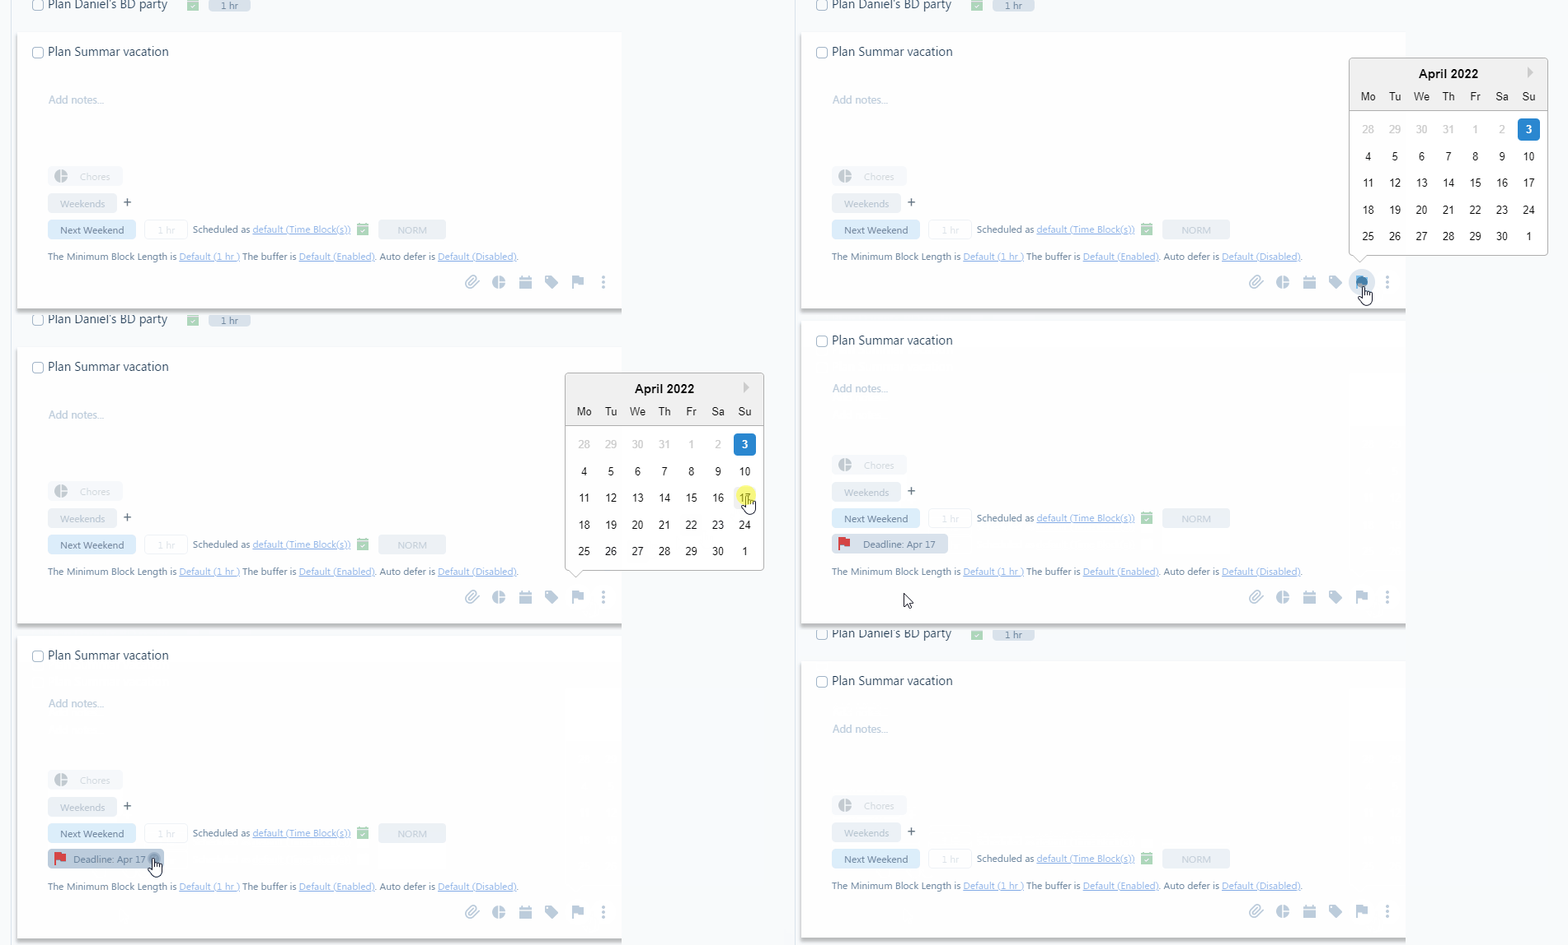
Alternatively, you can set the due date in the line detail by clicking on the due date icon in the lower right of the line detail:
Planning Projects (Parent Tasks)
When you set a plan for a parent line, the plan cascades down to the sublines under it. This is a great way to set a plan for a project and then the plan will be used for the tasks under the project. This is explained in detail here.
See also Parent Task Duration.
Fixed-Time Planning
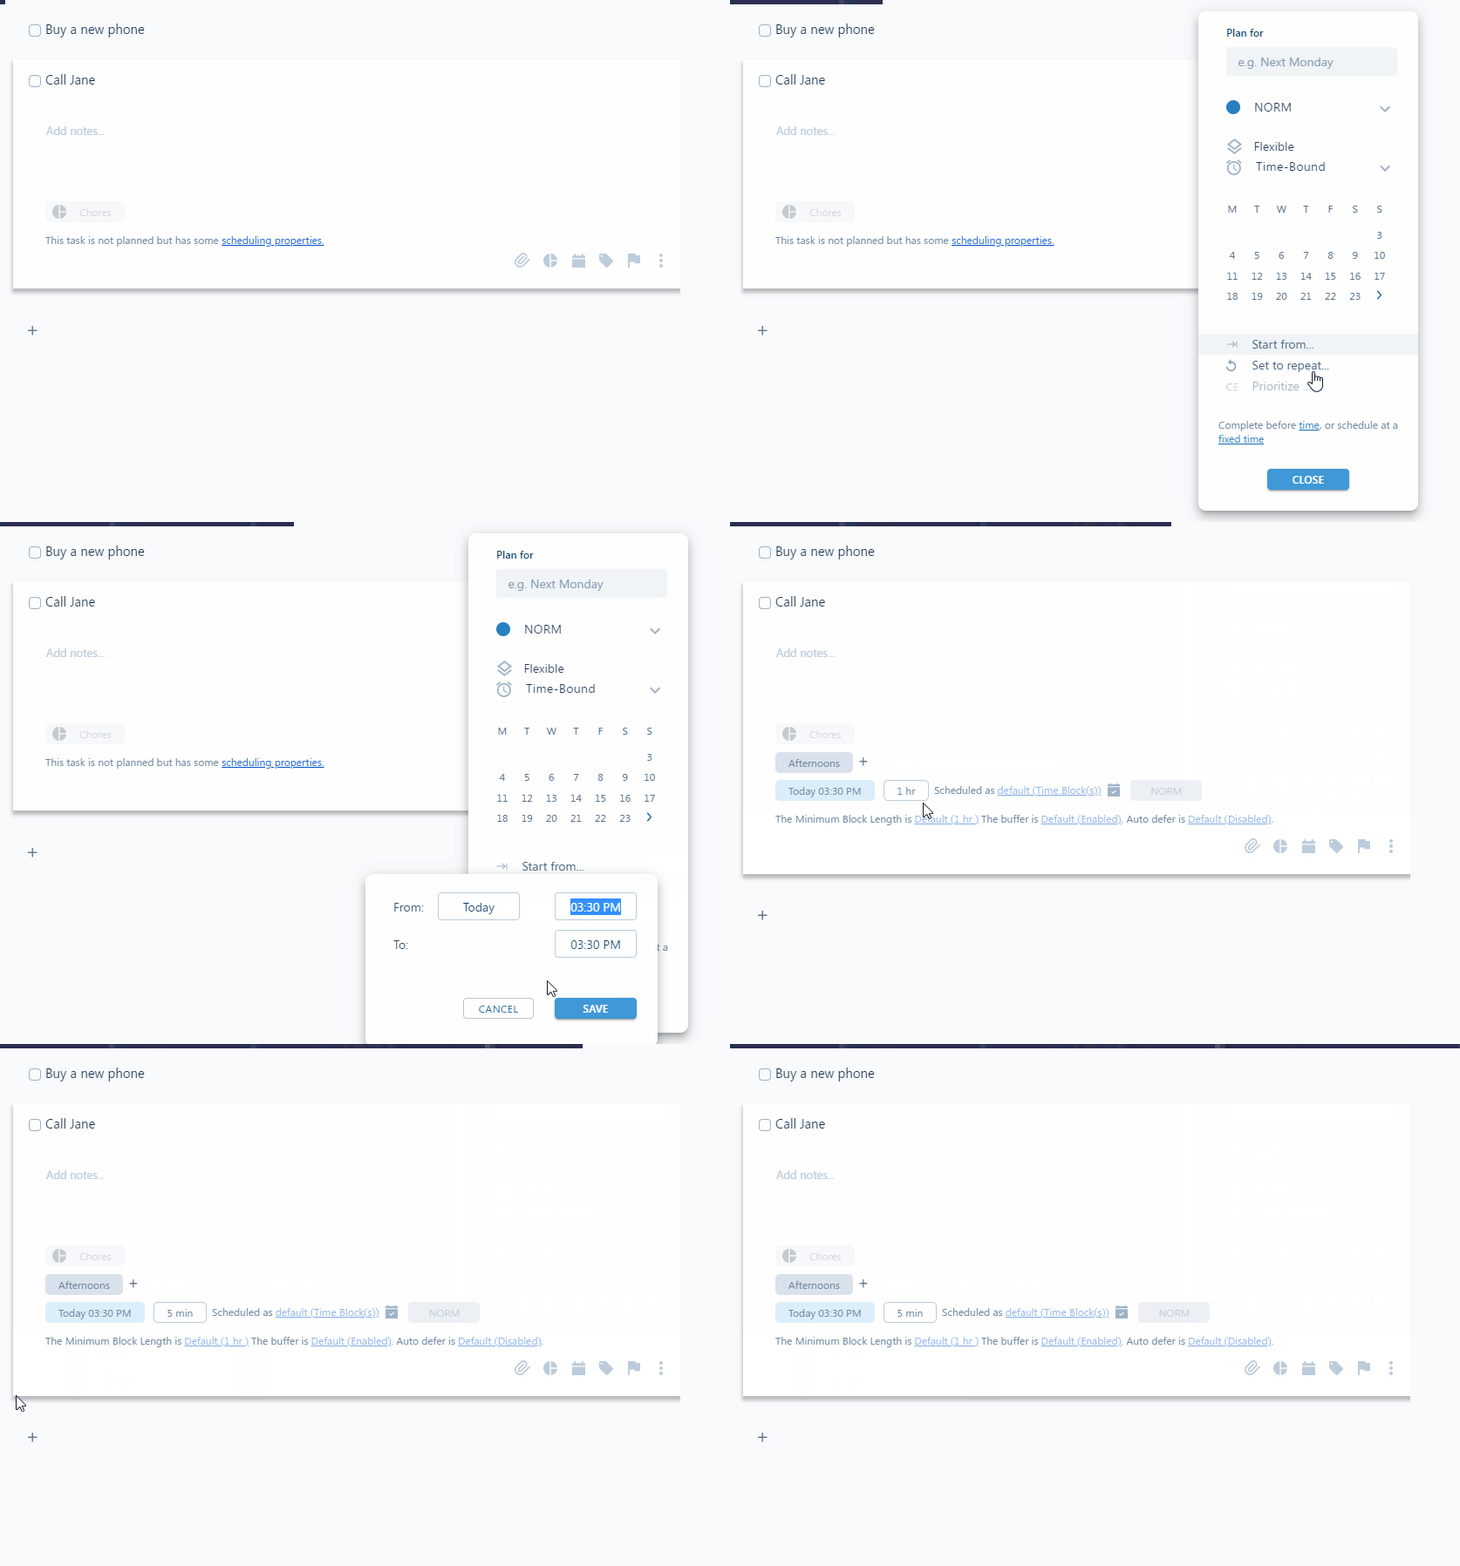
You can choose to plan your task for a specific date and time; e.g. tomorrow at 3 pm. Fixed-time plans do not get rescheduled like other tasks with fuzzy planning. They are like fixed events. The only exception is if you miss your fixed-time plan and the auto-defer is active for the task. In this case, your fixed-time plan turns into a fuzzy plan. And, if the auto-defer is not active, a missed fixed-time plan task will end up in Suggestions.
You can set a fixed-time plan using NLP as shown in the examples below:
Call Jason tomorrow 3 pm 5m
Sales meeting July 7 10am 2h
You can also set a fixed-time plan using the plan date picker:
Setting Multiple Plans For a Task
There are times when you want to break down a task with a big duration to different planning timeframes. For example, you want to have a task to write a paper and you estimate a total of 40 hours. You may choose to spend 20 hours this month and then another 20 hours next month.
To add additional plans, click on the plan icon in the line detail:

It’s worth noting that you may also add budget to your tasks. Without a budget, SkedPal tries to schedule the full duration of your task as soon as possible (based on priority.) But, when you add a budget, you’re constraining the maximum hours per day or maximum hours per week that can be scheduled.
So, you have two options: splitting your plan into multiple timeframes or adding a budget. Pick the best that works for you.